I was inspired by a recent thread I saw over on
Fred Miranda forums. The basic message was there are "noobs" appearing that are pretty darn good, and some established photographers are trying to hide their "secrets" and not sharing. The take home bit was sharing is good.
I don't pretend to be a wonderful photographer, but I decided to put up a walkthrough of this photo anyway. Someone out there might be able to learn from it.
Click on the picture before going further, it looks better large, the small version blocks up the blacks a bit more than they really are.
First thing you need to do to make a photo like this is break your foot.
I kid.
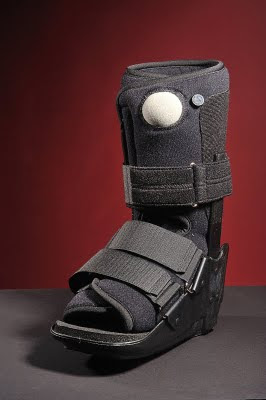
Really, the first thing to determine is "why". Was I trying to tell a story? If so what was it? I wasn't really trying to tell a whole story, but to build more on the busted foot endeavor I set out on a a couple months ago. This was the final assistant I got before moving to regular shoe.
When I first saw it I was struck by how it looked like a robot foot. I also noticed its texture. I wanted to emphasize both of those things in the photo.
I let those two things drive my technical decisions.
I felt that the texture could be brought out with hard light, and if I could simply retain a three dimensional appearance the robot-foot nature should shine through.
I set my key light to camera right and above the subject. I placed a secondary light to light up the back wall, and aimed it enough at the boot to edge it out a little bit. You may not realize its doing anything to the boot, but it is. Without it the left side goes black, completely, and utterly -- black, nothingness, blank, nothing blacker.
The ambient light was killed with a shutter speed of 1/200th of second. Aperture was set to F22 or F25. However, don't get caught up on these numbers, they aren't that important. They were set that way to get a proper exposure.
The post work done was pretty standard. I brought it into Nikon ViewNX for conversion to JPG. I changed the white balance from daylight to flash to warm it up a little. Yes, I could do this in the camera, sometimes I even do. But, I generally leave the camera set to daylight by default. Its a habit, but not a horrible one. All my film was daylight balanced!
After the conversion to jpg, I brought it into Gimp for sharpening. First I created a layer that contained a high pass filter applied to the image. I set this layer to the soft-light blend mode and flattened the image. I then used the smart sharpen script I wrote using the steps from the
Smart Sharpen Gimp tutorial as a guide.
That is it.
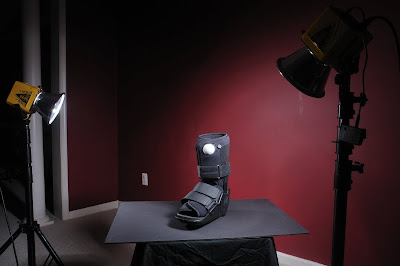
Here is a setup shot to show the flash positions.


